Creating educational videos often requires a significant amount of time, effort, and expertise in both content creation and technical execution. However, Large Language Models (LLMs) offer valuable tools that can automate and optimize the video production process
In this tutorial, I will demonstrate how to utilize OpenCV for image processing, harnessing the power of GPT-4 and OpenAI's Text-to-Speech (TTS) model to generate engaging educational content for explainer-style videos.
The Colab notebook with the code can be found here
Setting Up the Development Environment
We begin with the setup of the development environment and installing the necessary Python libraries to enable us to work with OpenAI's API and handle web-based media streams and recordings::
!pip install -qU python-dotenv openai ipywebrtc
This will install python-dotenv for environment variable management, openai to interact with OpenAI's API, and ipywebrtc for dealing with web-based media streams and recordings.
Once the environment is set up, I'll import the Python libraries and initialize the OpenAI client:
import os
from dotenv import load_dotenv
load_dotenv()

from openai import OpenAI
client = OpenAI()
Image Processing with OpenCV and Base64 Encoding
I will use the cv2 library (OpenCV) for image processing and the base64 library to encode binary data into a string. This makes embedding images in web requests, or JSON objects easier to transfer or store. The integration of these libraries facilitates the handling and preparation of images in automated workflows, allowing for efficient image transformation and data encoding.
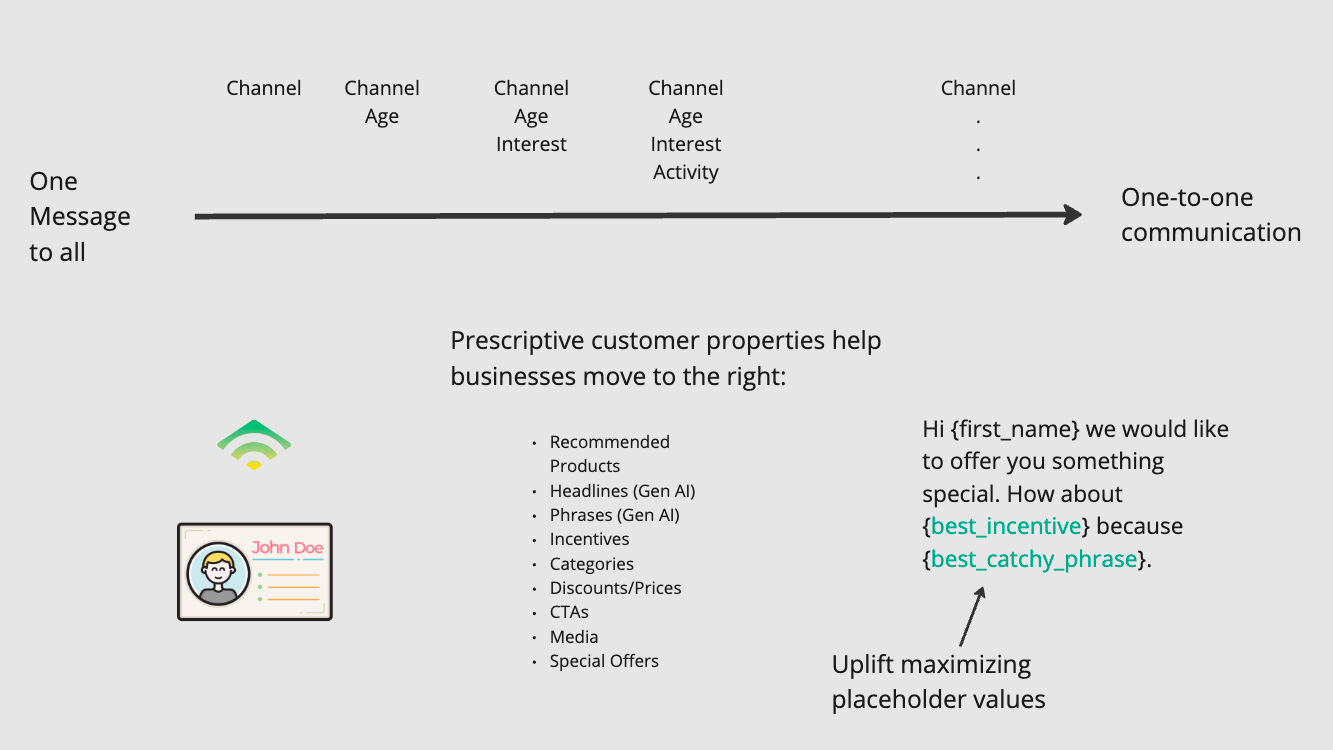
I'm going to have OpenAI explain the following slide detailing how causal machine learning can be used for email marketing personalization:

You can download the PNG file of the slide here:
Then I import the needed libraries for processing the image:
import openai
import cv2
import base64
from PIL import Image
import numpy as np

img = Image.open(r'upliftmax.png')
After loading the image, I can convert it into a format suitable for web or API usage. This involves encoding the images into base64, a text-based format that makes images easily transmittable and storable:
base64Frames = []
images = [img]

for img in images[0:1]:
    image_array = np.array(img)
    image_array = cv2.cvtColor(image_array, cv2.COLOR_RGB2BGR)
    _, buffer = cv2.imencode('.jpg', image_array)
    base64_image = base64.b64encode(buffer).decode('utf-8')
    base64Frames.append(base64_image)
Generating the Explainer Text
The magic happens when we provide a context for the image, guiding the language model to generate an explainer text. I will have the GPT-4 vision, and the TTS model explain the concept of uplift maximization with causal machine learning and how to personalize at scale with Klaviyo's template syntax.
Here's how to structure the prompt to the language model:
context = "Explain how uplift maximization with Causal ML + Klaviyos template syntax can be used to personalize profitably at scale. 5-8 sentences no bullets."

PROMPT_MESSAGES = [
    {
        "role": "user",
        "content": [
            f"Here are is one or more images of slides. {context}. "
            f"If you can't see the slide(s) don't make stuff up",
            *map(
                lambda x: {"image": x, "resize": 768},
                base64Frames[0:1],
            ),
        ],
    }
]

params = {
    "model": "gpt-4-vision-preview",
    "messages": PROMPT_MESSAGES,
    "max_tokens": 300,
}

completion = client.chat.completions.create(**params)
uplift_explanation = completion.choices[0].message.content
This will give us explainer text we can then feed to OpenAIs TTS endpoint:
"Uplift maximization with Causal Machine Learning (ML), in combination with Klaviyo's template syntax, offers a powerful method for personalized marketing that can drive profits at scale. This approach allows marketers to move from a traditional one message to all strategy to a more nuanced one-to-one communication approach by leveraging prescriptive customer properties...."
Converting Text to Speech
The final step is to convert the generated explainer text into speech and make it available in audio format. I'll use "alloy" as the voice and then feed the uplift explanation to the TTS model:
speech = client.audio.speech.create(
  model="tts-1",
  voice="alloy",
  input=uplift_explanation
)

from IPython.display import Audio
Audio(speech.content)
To download the audio file generated by the text-to-speech model in a Google Colab notebook, we can extract it from the variable speech.content. First, save the audio content to a file, then use the files module from google.colab to download it to your local system.
# Import the necessary module
from google.colab import files

# Specify the filename for the audio file
filename = 'output_audio.mp3'

# Write the audio content to a file
with open(filename, 'wb') as audio_file:
    audio_file.write(speech.content)

# Download the file to your local computer
files.download(filename)
This does the following:
- Imports the
filesmodule fromgoogle.colab, which contains thedownloadfunction needed to download files from Colab to your local machine. - Specifies a filename for the audio file. You can change
'output_audio.mp3'to any name you prefer, but make sure to keep the.mp3extension if you are using MP3 format. - Opens a new file in write-binary (
'wb') mode with the specified filename and writes the binary content of the audio (stored inspeech.content) to this file. - Calls
files.download(filename)to prompt your browser to download the file you just created to your local machine.
After executing this code, a download prompt should appear in your browser, allowing you to save the audio file to your preferred location on your computer.
This approach to content creation not only simplifies the process of making educational videos but also opens up new possibilities for creators to produce high-quality content efficiently. By automating the generation of narration for explainer videos, educators, marketers, and content creators can focus more on the creative aspects of their work, leaving the technical intricacies to LLMs.


